Hand Painted Woven Box Upcycle

Hand Painted Woven Box Upcycle

Watch the Video Tutorial Below!

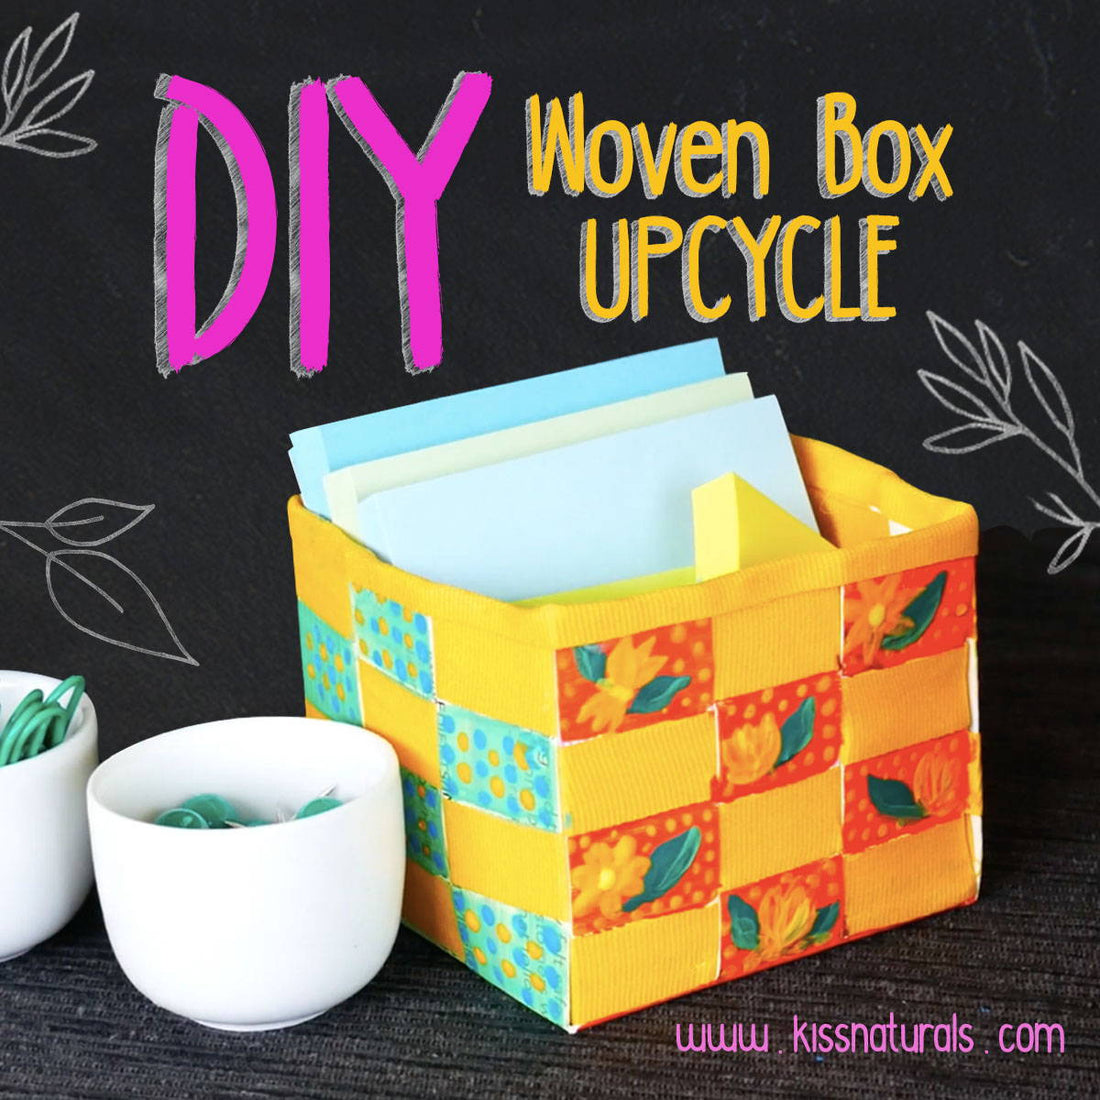
Looking for ways to reduce your waste? Not sure what to do with your Kiss Naturals boxes once you’ve done the DIYs? Today we’ve got a fun and simple way to turn your old Kiss Naturals box into a functional paper basket. Here we go!


What You’ll Need:

  • An empty Kiss Naturals kit box
  • A pair of scissors or a box cutter
  • A ruler
  • Hot glue gun (please ask an adult for supervision)
  • Ribbon of your choice (you can mix and match patterns and colors and reuse ribbon from a previous project, if possible)
  • Pen or pencil
  • Paint
  • Paint brushes (a few different sizes)

Optional:

  • Marker
  • Glitter/sequins
  • Feathers

Instructions:

  1. Enjoy your Kiss Naturals DIY kit!
  2. Upcycle the box from your kit by carefully taking it apart at the seams so that it opens completely flat.

3. Cut off the back side of the box (this should give you a nice square shape to work with).

5. Do the same 2 inches up from the bottom of the square and mark the position.

6. Draw a line straight down to connect your two markings.
7. Use the tip of your scissors press to down on the line just you drew, then fold the edge up to make this piece easier to work with.


8. Rotating your box 90 degree, repeat steps 4-7 on the right side of the square as well.

10. Cut out these squares – you should end up with a large white plus sign looking shape.


11. Looking good so far! Next, on each flap cut three small, evenly spaced slits from the edge of the flap to the crease.

12. Now that you’ve got the base for your box, let’s get weaving! Take your ribbon, attach it with a drop of glue (we are using hot glue) to the bottom of one of the small strips you made from cutting the slits and weave it in and out of each slit, all the way around the box, pulling the ribbon taught and forcing the strips to stand up and form the edges of your box.
13. After you’ve gone around the once, hot glue the end of ribbon firmly in place and trim.


15. Continue weaving rows of ribbon through the strips until you’ve reached the top. Once you've made it to the top you've got your box!

16. After you've glued your ends together, line the top inside of your box with a thin strip of glue. Fold the extra ribbon over the top and press it firmly down on the inside of the box.


Now you’ve created a beautiful upcycled box! Use all your old Kiss Naturals kit boxes to make a collection of woven boxes for your friends and family! Keep some yourself and use them to organize your school supplies, jewelry, toys, and so much more!

Once you’re done with your DIY, please tag us on Instagram @KissNaturals so we can see your masterpiece using the hashtag #knupcycles! Check out our YouTube channel and our blog for more DIYs using our all natural products.


Back to blog

Leave a comment

Please note, comments need to be approved before they are published.